Unicorn Photo Academy (Eight) : An Introduction to Photo Post Processing and Editing

Okay, so you’ve learned how to take pictures. Now what? You process them, silly! In the good old days you used to take your roll of film somewhere to get it developed, and you’d receive prints back. You didn’t know what your photos looked like until they were printed. In the digital age, you know what your photo looks like immediately after you take it. In fact, some cameras have electronic viewfinders that show what your photo looks like right before you take it.
The photos you take are stored on a memory card. You can shoot image file types of RAW or JPEG, or a combination of both. RAW is the purest form of the photograph containing unprocessed image data. JPEG is the compression of this data and the most common type of photographic file. An analogy to best explain their difference is that RAW is all the ingredients needed to make a cake, whereas the JPEG is a cake. In short, it is easier to change things about your image in RAW than JPEG, such as color temperature, white balance, and exposure. I always shoot in RAW so I can have control over my image, but if you’re shooting purely as a hobbyist--by all means keep things simple and stick with JPEG. Your smartphone always takes pictures in JPEG.
Now, what programs do you edit these photos in? Well, you are spoiled for choice. I personally subscribe to the entire Adobe Creative Cloud and process all my images in Photoshop and Lightroom. Adobe has a photography-specific subscription package available for around $10 a month that gives you both Lightroom and Photoshop. These programs are the professional industry standard and my personal recommendation for a photographer of any level--especially Lightroom. Lightroom allows you to edit your photos in various ways and you are able to export an entire batch at once, which can streamline your editing process once you get into it. For such a versatile, easy-to-use, professional program I think $10 month is a good value. Photoshop is great if you want to take your images a step further with creative editing and photo manipulation.
Another great option for editing photos is Snapseed. It is a free smartphone app from Google and is capable of doing as much editing as anyone ever needs. Adobe also makes free versions of Photoshop and Lightroom for your smartphone. If you aren’t going to do much printing of your images, these apps are likely all you will need as a hobbyist or amateur.
You might have already guessed that I’m not talking about anything like Instagram filters.
Before I get into some of the basics, I should mention that these programs have seemingly endless capabilities for editing, and as photographers grow they often find their own “style” in editing as they would while shooting. I personally am always learning more techniques with these programs, and like the process of photography, there is no cap to my skill. I will always be learning more.
Anyways, enough disclaimers. Shall we get into editing?
Color Balance and Correction

Admittedly, this can be tricky, but it is super important! So you know about white balance and how to set that in the camera. Well, sometimes the lighting and coloring still looks off even though you got it right in-camera. You can adjust color in just about every program, just think about what different colors are shed by different light, and what color to apply to counteract and correct the color. For instance, tungsten sheds yellow light, so you’ll want to add more blue. Flourescent lights shed a greenish cast, so you’d want to add more magenta. Adding colors is a balancing act in warming a photo up, cooling it off, or making it more neutral. You’ll want to play with Settings in Temperature or Color Balance with whatever program or app you’re using.
Levels, Curves, and the Histogram
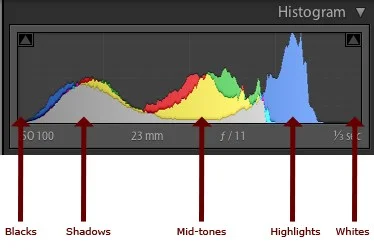
What is that graph of wavy lines on the back of your camera, and in Photoshop and Lightroom? That’s a histogram! A histogram is a graphical representation of the tonal values of your image. In other words, it shows the amount of tones of particular brightness found in your photograph ranging from black (0% brightness) to white (100% brightness). You can use the Levels and Curves tools to adjust these tonal ranges.
Healing Tools

Did you take a photo and you can’t help but notice a zit? Well, unlike real life you can just get rid of it. You are looking to use a healing tool, such as Photoshop’s Healing Brush. Most apps only have one healing tool, but Photoshop has a few others to choose from in addition to their brush. These tools can work in slightly different ways but in the end they all do the same thing. If you are photoshopping a zit, you are essentially taking an area of good skin and popping it over the blemish. I will definitely get more into this with a more detailed post later on in the series, so keep your eyes peeled for that.
Sizing and Cropping
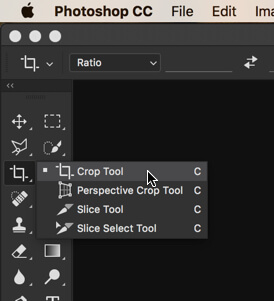
Personally, I try to avoid cropping whenever possible. It’s how I was taught, and if I want my image to retain its quality, then I need to get the framing I want in-camera. It is also best practice for mastering composition. However, there may be times when you have to crop and resize your image. If I were to print a high quality image of my photograph, I would make sure that it was the size it was shot at. My D750 has a 24.5 megapixel sensor, which results in images at 14x9 inches and at 300 DPI. What’s DPI? It stands for dots per inch, which tells you how many pixels are in that area (also known as PPI, or pixels per inch). Ideally no photograph should be printed for high quality at less than that. However, if you’re putting your photo online, you may have to crop it for social media or to fit a website or blog. Most social media sites will compress the images when you upload them, but if you don’t want an image to take a long time to load, you should drop that resolution down to 72 DPI. You may have to adjust the size of the image if you change the aspect ratio and to ensure it will upload to the size you want for the web.
Text tool

This one is pretty self explanatory, but if you wanted to add text to your photo--such as a copyright with your name--most programs and apps have this option. It usually involves a text box you can click, drag, and move to wherever you want, and then adjust font and size in another panel.
Saving Images
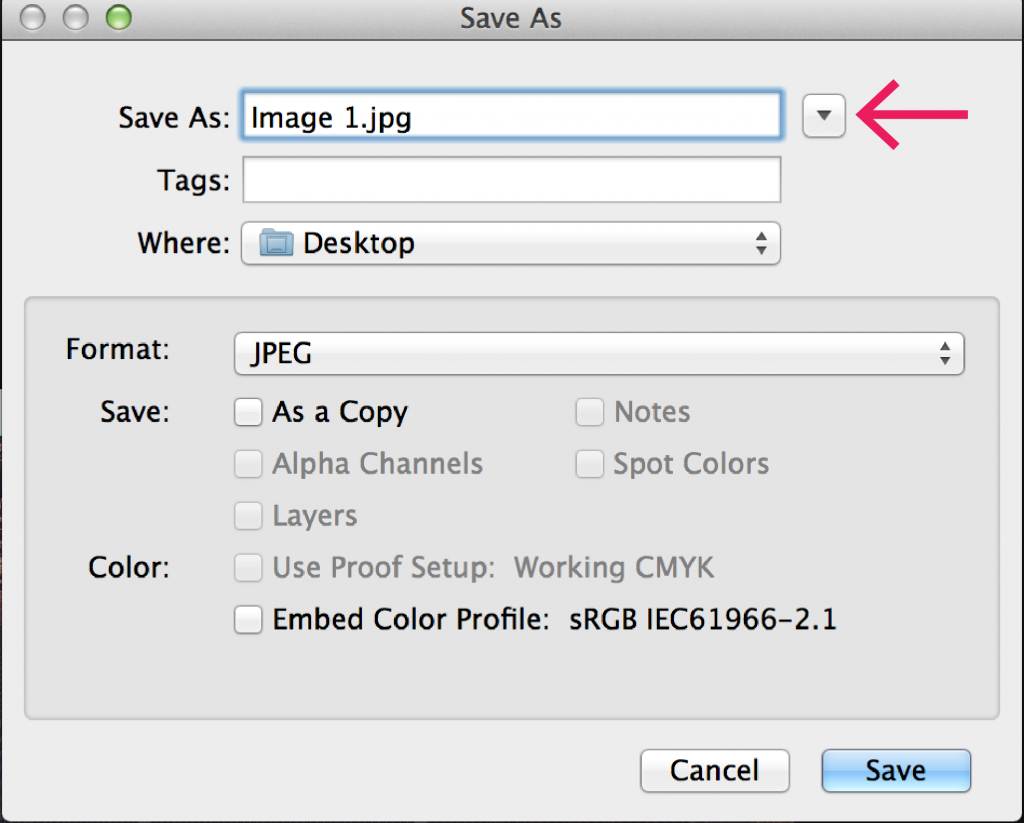
When you are saving a photo in its final version, most times you will want to save it as a JPEG. We touched briefly on resolution with cropping and resizing, so if you want to print the photo as a high quality print, make sure you are saving it as a 300 DPI JPEG. If you are exporting to web, JPEG is fine, but so is PNG (portable network graphic). If you are doing this in Photoshop or Lightroom, you can do File>Save As or File > Export for Web.
Thanks for sticking around and reading this entire post! As I was writing it, I realized this could have been multiple blogs in one. And guess what? There’s more where this came from. This is only the beginning of your adventures as a photo editor! If you are looking to further your editing skills beyond this post (which you most definitely should), do your own research at your local library, take a class or two from your local camera shop or community college, see if your town has any photography groups or courses at the rec center, or find some tutorials and blogs online! Most of my editing skills are self-taught. The easiest way to start editing is to think of how your edits can look as true-to-life and balanced as possible. After that, you will find your own methods of making images look unique to you and fit your style. I’ve said the word style ENOUGH during this blog, haven’t I?
Alrighty then, don’t forget to use the hashtag #UNICORNPHOTOACADEMY!
Sincerely,
The Girl in the Unicorn Pajamas