The Unicorn Academy Guide to Amateur Photography (Lesson Three): "Seeing the Light" - ISO, White Balance, Exposure

Everyone knows how to “point-and-shoot” a camera. Photography is all about understanding light, and it is especially important to understand it when you are shooting manual. Yes, there are practices that can apply to any type of shooting--but when you are able to control how much light you let in to your camera and at what speed, it’s important to really take a look at the world around you and how light works: inside, outside, natural, artificial, with weather, etc.
I apologize if this post will be long-winded, but it’s important. If you hang in there with me, there will be kittens at the end. I promise.
Anyways, we were talking about light. Have you ever tried taking a picture with your phone on a cloudless, sunny day at high noon, only to see all these harsh shadows on your friend’s face? Do you get super frustrated? Well, it’s all about looking around and finding the right light in the right places. Take a walk with your new camera just around the block. Try it in the morning with your dog, try it at lunch, try it in the evening. Getting out there and taking a mental inventory of the light will help you begin to understand how to capture a proper exposure.
There are two go-to lighting situations outside that always look amazing. These are overcast days and golden hours. Many people don’t go into photography thinking this, but cloudy days are SO awesome for photography. The cloud cover diffuses the harsh light of the sun which results in even-lighting everywhere outside, any time of day. It’s nature’s version of putting a softbox over a studio light. The second go-to lighting situation is golden hour. This period of time occurs twice a day: two hours after sunrise, and two hours before sunset. The sun is low in the sky, and the color of the light is warm, and glowing (hence the term, golden hour). I always try to book sessions during these times if I can help it, and these looks are popular and requested by many of my clients.
Okay, I’ll try to talk about how to combat less-than-ideal lighting situations such as a cloudless high-noon and hopefully be quick about it (honestly, light could be a neverending blog series on its own). If I’m taking portraits during noon when the sun is out, I always keep my subject’s back to the sun whenever possible. This keeps the harsh rays out of their eyes (no one likes to squint, and no one should look into the sun….duh) and also it reduces the hard, unflattering shadows. I also take my subjects into even, shady spots on these days. If they’re out of the sun and staying cool in a spot where the light is even, great pictures can happen.
Those were just two examples, but you catch my drift. You’ll figure a lot of tricks out that work for you as you practice observing light with your photography.
White Balance
Speaking of light, all lights cast color. Unless the light is manipulated by a colored gel or glass on a bulb, you might not be able to tell a difference in most everyday situations. This is because your brain adapts and corrects the light while your camera cannot. Two common examples where you have to deal with white balance is artificial lighting such as tungsten and fluorescent. Tungsten sheds a yellow cast while fluorescent sheds a slight pale green cast. You can change your white balance in your camera’s settings to help neutralize the lighting. For example, the camera will add blue to neutralize the yellow, and magenta to help with the fluorescent lights. Sure, you can fix this in post processing, but it’s much easier to get it right in-camera (which is a theme I’m sure I’ll repeat in this series). To correct that with film, you would have to put a colored filter on your lens--blue would correct for tungsten light, and so on.

Image shot in a room lit by tungsten bulbs, no white balance correction.
This is the same image with the white balance corrected (the camera adds more blue to counter-act the yellow light)
Okay, let’s talk about how this all works with exposure. ISO, Aperture, and Shutter speed are considered the three elements of exposure. Exposure is the light per unit area reaching film or a digital sensor. How exposure occurs is based on how these three elements work together.
ISO
ISO basically is the level of sensitivity of your camera to available light. If you remember the good ol’ days of film, film was always labeled with a number: 160, 200, 400, 800 and so on. These numbers measured how sensitive the film was to light, and this is the same for your camera’s digital sensor if you’re shooting digital, which most of us are in this day and age. The higher the number, the more sensitive the camera is. For example, lower ISO’s are for well-lit situations such as bright studio lights and sunny days whereas higher ISO’s are for low-light and darkness. You will also find that with higher ISO’s, photographs will be grainy. This is because your camera is trying to make up for the loss of light. You might notice this with pictures taken on your cell phones in dark rooms with no flash.

At the dog park in broad daylight, 200 ISO

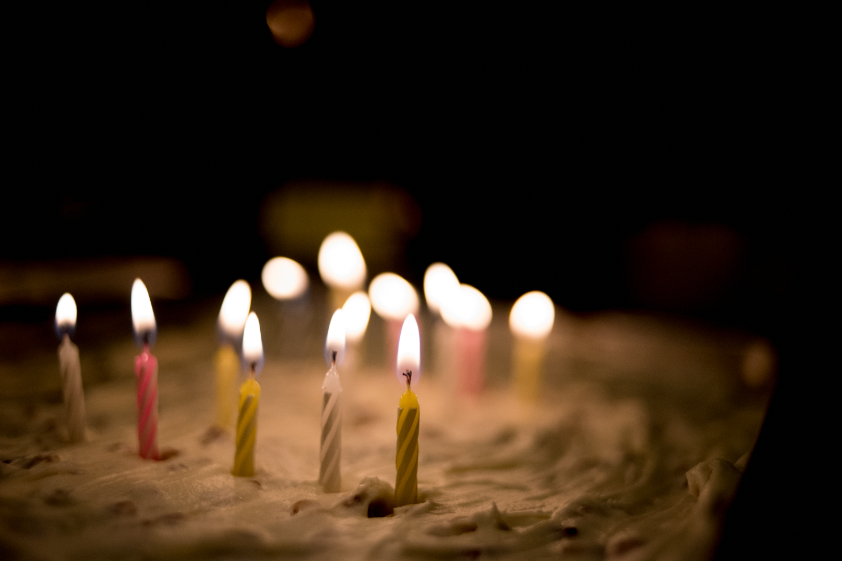
Room indoors at nighttime lit with 1 tungsten bulb, 3200 ISO
Less importantly, ISO stands for International Organization of Standardization, which was carried over from film. Film had an ISO rating, but was better known as “film speed.”
Aperture
Aperture is the amount of light let into the camera, and shutter speed is the time for which a shutter is open at a given setting. The available light in the area you are photographing enters the lens through your aperture where the sensor or film collects the information in front of it and when the shutter closes, the camera is done capturing the image. The idea is to not let too much light in as that over-exposes the image or too little as that under-exposes the image. The more light you allow, the faster the shutter should close, and vice-versa. With most photographs, you are looking for a balance so that your image is neither over nor under exposed.
Shutter Speed
Shutter speed is the amount of time for which the shutter is open at a given setting. The button that you push to take a picture is called your shutter release button. When you push it down, you open the shutter to allow light to pass through the aperture exposing the scene to your camera’s sensor for whatever amount of time the shutter is set. When you hear that “click” the shutter closes and the picture is taken. The faster your shutter speed, the more you are able to freeze motion. With slower shutter speeds, you can get blur from motion. Its interaction with aperture is a balancing act as previously mentioned.
I think the basics of photography are very simple to understand, but they may be something of a learning process in practice. There are many resources available when it comes to learning photography. Many universities, community colleges, camera shops, photography clubs, and rec centers offer classes. The internet also has many resources such as Digital Photography School, and I’m sure I’m not the first blogger that has shared learnings on photography basics.
Once you’ve got ISO, White Balance, and Exposure built into your general knowledge, the fun part begins. When I took my first photography class in college, I had no idea that I would like it as much as I did and eventually take it up professionally. Perhaps you, too, will catch the “photography bug.”
Remember, if you’re following this series and practicing photography, tag your photo with #UNICORNPHOTOACADEMY to share with others!
Sincerely,
The Girl in the Unicorn Pajamas
PS: Here are your kittens!